In this introduction to HTML, you learn the basics of modern web design using HyperText Markup Language, or HTML for short. HTML is a set of codes that we can add to text documents. These codes, for example, tell a web browser whether something should be displayed as a regular text paragraph like the one you’re reading right now or as a header or title.
Besides paragraphs and headers, there is a lot more you can create with HTML:
- Sections
- Links to other pages
- Tables
- Lists
- Italic text, bold text, or even
strikethroughtext - Superscript and subscript
- .. and so forth
Table of Contents
What HTML looks like
Have you seen HTML before? Before we dive in, let’s look at the HTML of a very basic webpage:
<!DOCTYPE HTML>
<html>
<head>
  <title>My first webpage</title>
  </head>
  <body>
    <h1>Hello world</h1>
    <p>This is my first webpage.</p>
  </body>
</html>Code language: HTML, XML (xml)
So what do we see here? We’ll dissect the example, without diving in too deep. After all.. we’re just getting started!
The Doctype
The HTML document starts with this weird-looking doctype definition, <!DOCTYPE HTML>. This tells the browser that this is an HTML 5 file, the most modern version of HTML.
There are also older versions with different doctype definitions, but that doesn’t matter to us. We’re creating modern websites, and we’ll only use HTML 5, the current version of HTML. Every recent browser understands and supports HTML 5, including mobile browsers on Android and iOS.
HTML Tags and elements
Any HTML page is full of HTML tags, and Most HTML tags surround something: a piece of text, for example. So there’s an opening tag, a closing tag, and something between them.
Let’s take a look at the <p> tag from the example HTML page above:
- The <p> tag is used to ‘open’ a paragraph.
- Some text follows, in this case: ‘This is my first webpage.’
- Finally, we close the paragram with </p>
HTML elements
This pattern applies to almost all the tags:
- We open with a specific tag (like p, h1, and body) surrounded by the less than and greater than signs: < and >
- Then, some optional content follows, which can also contain HTML tags.
- We close with the same tag name by adding a forward slash before the tag name: /
We call the complete set of an opening tag, a closing tag, and the content between an HTML element.
Nesting
As you can see in the example HTML document above, HTML relies heavily on the nesting of elements. The top-level element of any document is the html element, formed by the <html> and </html> tags.
Nested inside this html element, we have the head and body elements. In turn, the body has the nested elements that form the h1 header and a paragraph of text.
There’s more than HTML
Although you can create a website solely using HTML, it would be a dull experience for your visitors. HTML is closely tied to two other technologies: CSS and JavaScript. In this introduction to HTML, we won’t look at those yet, but I will introduce these to you to give you a more complete picture of the ecosystem.
Separation of content and style
In the early days of web development and HTML, we would also define the style of a page using HTML, by which I mean things like colors, sizes, and the width of elements. These days, we have CSS for this purpose, which is a good thing.
With CSS we can separate the styling of a page from the actual content. It allows us to easily change the style of a page. I’m sure you’ve seen sites where you can choose between a light or dark color scheme. That’s done by switching to a different set of CSS instructions, while the HTML stays the same.
Making a site interactive
HTML pages are static. To make a site interactive, we need JavaScript. Where HTML defines the content, and CSS defines the styling, JavaScript defines the behavior of a website. I know this is a lot to process, so in case of doubt, here’s the order in which you should familiarize yourself with these topics:
- First learn HTML,
- then CSS,
- and finally JavaScript.
Creating HTML documents
Now that we have some basics under our belt, it’s time to create an HTML file. Although we’ve already seen a complete HTML page in the introduction, you haven’t created one yourself. In the next sections, you’ll create an HTML file on your computer and open it with a web browser. This will be your first homemade web page. Let’s start!
Software to create an HTML file
The first step is to create a file on your computer with the .html extension. It’s important to use the right tool for this job. You can’t use a word processor, like OpenOffice or Microsoft Word, to create HTML files. Such programs have their own markup language that is added to the document.
What you need instead, is something that can edit what we call plain text files. Preferably, you use something specifically tailored to writing HTML. Specific HTML editors help you in a number of ways:
- They offer auto-indenting, making your document much more readable.
- With auto-completion, you have to type less. HTML editors will often add the closing tag automatically, for example.
Visual Studio Code
There are several options to choose from, and it mostly is a matter of taste or personal preference. Since I can’t cover all of them, and we have to start with something, I’ll go with what I think is best for most, and that is an application called VSCode. I would like you to start with VSCode for a number of reasons:
- It is free to download, and based on open-source code.
- It works on the big platforms: Windows, MacOS, and Linux (there’s even a browser-based version).
- It’s fairly lightweight, while still offering tons of features.
- There are countless plugins available that help you develop websites quickly.
- It supports many other programming languages and document formats, like CSS and JavaScript, but also Python, Java, Go, etcetera.
- It’s created and backed by Microsoft, so it’s unlikely that the software will get abandoned anytime soon.
I already covered this tool extensively and if you are interested, I encourage you to read the following articles:
- Detailed instructions on how to install VSCode
- A tour of the VSCode interface
- What are VSCode extensions and how to install them
Once you have VSCode installed and running, we can continue. Please note that, although there are many HTML extensions for VSCode, we don’t need those for now. VSCode in itself is more than enough, and it helps to keep the interface clean and basic while you have so much to learn already.
Create an HTML file in VSCode
A VSCode window always shows one workspace. A workspace can, in turn, show multiple folders (or: projects) if you want it to. In turn, you can have multiple workspaces open, each in its own window. However, we’ll work on one project at a time. When doing so, one window with one workspace is enough.
Create a project
Creating a project is simple; it’s a directory that you open with VSCode. If you are on a terminal, and it doesn’t matter if this is on Linux, MacOS, or Windows, you can create a new project and open it with VSCode as follows:
mkdir html_tutorial
cd html_tutorial
code .Code language: Python (python)
The code command is a handy shortcut to open a VSCode window. If you prefer, you can also open (and create) the folder from the menu: File -> Open Folder.
Once the project is opened, create a new file with new file button. It may be hidden, but it will appear once you hover your mouse over the project name in the explorer window.
Name the file my-first-page.html, or something else if you like. Just make sure to add the .html extension, so VSCode directly knows that this is an HTML file.
It’s good to know that you’ve done a lot of plumbing by now. It always takes a while to get set up properly, but once done and out of the way, you’ll be much more productive. And trust me that, with VSCode, you have a great tool at your disposal. It’s used to create much of the software, apps, and websites that you know and love.
Typing the HTML
Finally, we can start typing the actual HTML page. I’ll list what you have to type in below, but it’s important to enter the actual tags yourself. You’ll get a feel for how the editor works and helps you while doing so. And, more importantly, you’ll get more acquainted with the HTML language and its tags.
Here’s your first webpage, and feel free to modify it to your liking:
<!DOCTYPE html>
<html>
  <head>
    <title>My first webpage</title>
  </head>
  <body>
    <h1>Hello world</h1>
    <p>This is my first webpage. How are you doing?</p>
    <h2>This is a sub-header</h2>
    <p>And here's some more text.</p>
  </body>
</html>Code language: HTML, XML (xml)
If you followed my advice, you must have noticed how VSCode helped you by inserting closing tags automatically and indenting your code automatically.
One hint I want to share with you is how to format your HTML document manually. Try removing some of the indentations inside your file, and then press shift+alt+F. Did you notice that VSCode fixed the formatting?
Finally, save the file. You can do so using the file menu, or by pressing control+F (cmd+F on MacOS).
Opening a HTML file in a browser
It’s time to open the file in your browser and see the result of all this labor! There are two ways to do this.
- You can go to the project’s folder and double-click the
my-first-page.htmlfile. - Press control+O (Windows, Linux) or cmd+O (MacOS) to open a file and browse to the
my-first-page.htmlfile. I tested this shortcut in Firefox, Edge, and Chrome.
The end result should look like this:
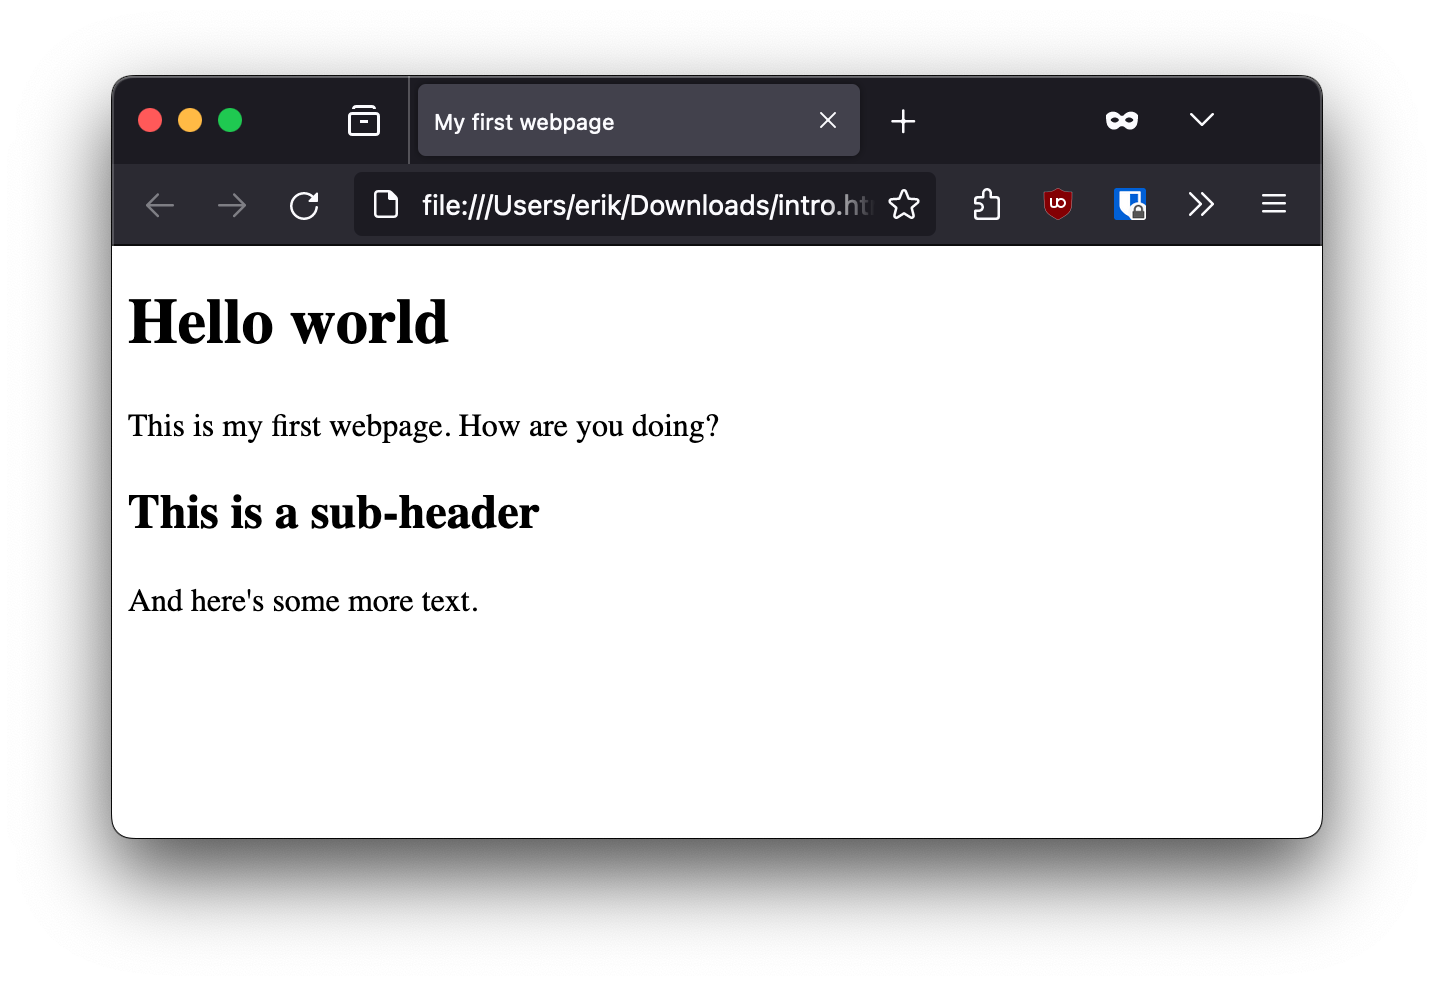
As you can see, the title (between title tags) gets shown as the title of the browser tab. The browser also uses it when someone bookmarks your page.
Congratulations on this achievement! It was a bit of work, but getting started with something new is always hard. You paved the way to learning more HTML tags and starting to experiment on your own. So, let’s continue with the following article about HTML tags, where you’ll discover some of the most important tags used in webpages.
Learn more about HTML
You can continue reading and learning about HTML with the article HTML tags and attributes.
There are other markup languages as well, one of which is Markdown. As a developer, you will often run into documentation files that contain Markdown formatting, so it pays to at least know what it is. You can do a lot with Markdown that you can also do with HTML but with a more readable, less obtrusive syntax. Markdown files are actually often converted into HTML pages (e.g., on GitHub). To get a quick overview of what’s possible with markdown, check out this markdown cheat sheet.