Is your Python project difficult to build from source, hard to share with colleagues or, difficult to deploy to production? Docker is the ideal tool to solve this for your Python project.
Several reasons exist for those hard to deploy projects, and here are just a few:
- The project requires lots of dependencies.
- The project requires outdated versions of some libraries or an outdated compiler. Once you install it, other projects might break in turn.
- You’re running Windows or a Mac, but the software is designed to build and run on Linux
For similar reasons, it can also be hard to run your software in production!
If you’re facing these problems, it’s good to know that there’s an easy fix. It doesn’t require virtualization but instead uses a principle called containerization. Simply put, containerization is a very lightweight alternative to virtualization. The defacto standard in the containerization world is Docker, so that’s what we’ll be using to containerize a sample Python project.
Table of Contents
What is a container?
A container is an entity that has everything required to run your software. It packs:
- Your software
- All dependencies
- All system tools and libraries that might be needed
Containers are like virtual machines but more lightweight. For instance, they start almost instantly. Containers virtualize just the operating system, while a VM virtualizes an entire machine with all its hardware. If you want to know how this works exactly, please read up on it at the excellent official documentation.

Docker containers have become a standard. They can run anywhere: from your development PC to a self-hosted server to cloud hosting services like Amazon, Google, and Azure. Containers make it easy to package and ship your software and provide a well-defined environment for it to run in.
What is an image?
A Docker container is always based on an image. You first define an image and then start one or more containers based on it. You can define an image in a file (called the Dockerfile) and this file can be checked into a VCS like git, together with your code. This allows you to document and create the exact environment needed to run your code.
You don’t have to build an image from scratch. Many software projects provide images that containerize their software. For practically all computer languages, including Python, there are multiple base images you can choose from.
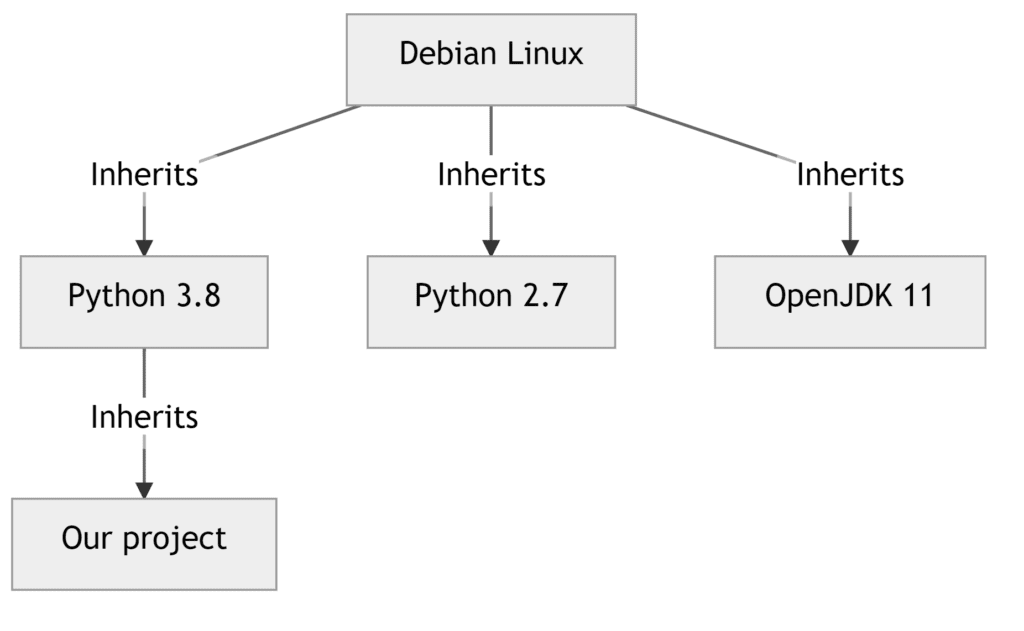
Just like Python classes, you can extend such images with your specifics, as I will demonstrate below. By doing so, you are adding a new layer on top of an existing image. Because of this layering, Docker images can be stored and built very efficiently. For example, many images might all share the same Debian Linux base image and extend it with their specific software requirements:
Dockerize your Python project
Creating a container for your software is super easy. After making my first Docker image, my thoughts were roughly this: “Is this all? I must have skipped a step!”
I’ll create a Python project as an example here, but this is just as easy for other languages. Furthermore, I’ll intentionally work from Windows, even though I’m a real Linux junkie. And to top it off, I’m not going to install Python on Windows at all, just to prove the power of containerization.
If you want, you can follow along. The article contains everything you need. Alternatively, you can clone this code from Github too.
A simple web app
Assume we want to create a web service using Flask. It has some dependencies that are defined in a Pipfile, to be used with Pipenv.
I’ll start very simply, with the following Pipfile:
[packages]
Flask = "*"
For now, we’ll create a Python file just to prove that things are working as expected. I called it app.py:
print("Hello world")
Creating your own Docker Python image
Next, we need to create a Dockerfile that defines our container. Most projects these days offer official versions of their software as a Docker container. After a quick Google search, it turns out Python does so too. They even give us an example to start with.
Their example is based on virtualenv and we prefer Pipenv so it needs a few adaptions. This is what I came up with:
FROM python:3
WORKDIR /usr/src/app
COPY Pipfile ./
RUN pip install --no-cache-dir pipenv && pipenv install
COPY *.py .
CMD [ "python", "./app.py" ]
To learn more about the syntax of a Dockerfile, it’s best to go directly to the official documentation on Dockerfiles.
To build your container, you need to run the docker build command. If you’re using an advanced IDE like VSCode, you’ll be able to install a Docker extension allowing you to simply right click the Dockerfile, give it a name (called a tag), and start building. In this case, I prefer the command-line because it shows us exactly what we’re doing and keeps us in control of all the options. So we’ll build our image on the command-line:
C:\dev\python-docker> docker build -t my_webservice:latest .
Let’s break it down:
- We’re building an image and tagging it with the name my_service and the version latest (which is the default, so you could leave it out)
- The single dot simply means Docker needs to look for the Dockerfile in the current directory
When you run this for the first time, there will be lots of activity:
- Docker starts pulling the python docker image first
- Next, we set the working directory to /usr/src/app
- We copy the Pipfile into the working directory
- We run pip install to install pipenv
- directly after it, we run pipenv install to install our dependencies
- Finally, we copy all python files to the working directory
You should see something similar to the screenshot below:

Our image is finished and we can run it with docker run. Let’s try:
PS C:\dev\python-docker> docker run my_webservice
Hello world
PS C:\dev\python-docker>
Improving our Python Docker image
We have the basics working, so let’s create an actual web service now. Adapt app.py to look like this basic Flask example:
from flask import Flask
app = Flask(__name__)
@app.route('/')
def hello_world():
    return 'Hello, World!'
Because we’re running a Flask app now, we need to alter the CMD in our Dockerfile too:
CMD [ "pipenv", "run", "python", "-m", "flask", "run", "--host=0.0.0.0" ]
As you can see, we need Flask to listen on all network interfaces. Otherwise, It would just be listening on localhost inside the docker container and it would be unreachable to the outside world.
Rebuild the Docker image with the same command as before:
C:\dev\python-docker> docker build -t my_webservice:latest .
And since we’ll be running an actual server on port 5000 (Flask’s default), we need to expose this port. For extra security and to prevent overlapping ports, Docker, by default, won’t expose ports. Docker offers strong isolation, which is more secure as well! You can map a port from the container to a port on your PC with the -p command-line option:
C:\dev\python-docker> docker run -p 5000:5000 my_webservice
 * Environment: production
 * Debug mode: off
 * Running on http://0.0.0.0:5000/ (Press CTRL+C to quit)
Now head over to http://127.0.0.1:5000/ to see the service in action. You should get a page saying “Hello world” and you should see a log entry appear on your command-line.
Use my pre-built image
If you don’t want to go through all the steps, but still like to test running this example, you can do so by pulling the image from my public Docker Hub account with the following command:
docker pull eriky/hello_world:latest
After that, you can start the image with: docker run -p 5000:5000 eriky/hello_world.
If you’d like to check out the source code from GitHub, head over to the accompanying repository here.
Keep learning
- Learn how to build and deploy your Python project automatically, using continuous integration.
- If your application is a success, here are some guerrilla tactics to scaling the application without spending millions.