In this tutorial, we’ll make a Python Discord bot that can play music in the voice channels and send GIFs. Discord is an instant messaging and digital distribution platform designed for creating communities. Users can easily enter chat rooms, initiate video calls, and create multiple groups for messaging friends.
We’ll skip the basics and jump straight over to the music playing. Check out this Medium article to catch up on the basics of setting up your bot. In the end, our Python Discord bot will look like the cover image of this article!
Before we dive in: remember to allow Administrator permissions for the bot.
Thanks to Rohan Krishna Ullas, who wrote this guest tutorial! Make sure to check out his Medium profile for more articles from him. If you want to write for Python Land too, please contact us.
Table of Contents
Part 1: Importing all the libraries
First, create a virtual environment and install the requirements:
discord==1.0.1
discord.py==1.6.0
python-dotenv==0.15.0
youtube-dl==2021.2.10Code language: Python (python)
Next, let’s set up the .env file for our project. Create a .env file so that we can separate the environment configuration variables (these are variables whose values are set outside the program) from the main code:
discord_token = "copy_paste_your_bot_token_here"Code language: Python (python)Then use Python import to load all the needed modules in the main file app.py:
import discord
from discord.ext import commands,tasks
import os
from dotenv import load_dotenv
import youtube_dlCode language: Python (python)
The module youtube_dl is an open-source download manager for video and audio content from YouTube and other video hosting websites.
Now we need to set intents for our bot. Intents allow a bot to subscribe to specific buckets of events, allowing developers to choose which events the bot listens to and to which it doesn’t. For example, sometimes we want the bot to listen to only messages and nothing else.
load_dotenv()

# Get the API token from the .env file.
DISCORD_TOKEN = os.getenv("discord_token")

intents = discord.Intents().all()
client = discord.Client(intents=intents)
bot = commands.Bot(command_prefix='!',intents=intents)Code language: Python (python)
Part 2: Using youtube_dl to download audio
The next step in building our Python Discord bot is dealing with the part that actually downloads the audio file from the video link we provide. Please note that this bo is just a demonstration. It’s not illegal to download from YouTube for personal use according to this article, but it might be against the YouTube Terms Of Service. Please be sensible and use this for personal use only.
youtube_dl.utils.bug_reports_message = lambda: ''

ytdl_format_options = {
    'format': 'bestaudio/best',
    'restrictfilenames': True,
    'noplaylist': True,
    'nocheckcertificate': True,
    'ignoreerrors': False,
    'logtostderr': False,
    'quiet': True,
    'no_warnings': True,
    'default_search': 'auto',
    'source_address': '0.0.0.0' # bind to ipv4 since ipv6 addresses cause issues sometimes
}

ffmpeg_options = {
    'options': '-vn'
}

ytdl = youtube_dl.YoutubeDL(ytdl_format_options)

class YTDLSource(discord.PCMVolumeTransformer):
    def __init__(self, source, *, data, volume=0.5):
        super().__init__(source, volume)
        self.data = data
        self.title = data.get('title')
        self.url = ""

    @classmethod
    async def from_url(cls, url, *, loop=None, stream=False):
        loop = loop or asyncio.get_event_loop()
        data = await loop.run_in_executor(None, lambda: ytdl.extract_info(url, download=not stream))
        if 'entries' in data:
            # take first item from a playlist
            data = data['entries'][0]
        filename = data['title'] if stream else ytdl.prepare_filename(data)
        return filenameCode language: Python (python)
The from_url() method of YTDLSource class takes in the URL as a parameter and returns the filename of the audio file which gets downloaded. You can read the youtube_dl documentation at their GitHub repository.
Part 3: Adding commands to the Python Discord bot
Now let’s add the join() method to tell the bot to join the voice channel and the leave() method to tell the bot to disconnect:
@bot.command(name='join', help='Tells the bot to join the voice channel')
async def join(ctx):
    if not ctx.message.author.voice:
        await ctx.send("{} is not connected to a voice channel".format(ctx.message.author.name))
        return
    else:
        channel = ctx.message.author.voice.channel
    await channel.connect()

@bot.command(name='leave', help='To make the bot leave the voice channel')
async def leave(ctx):
    voice_client = ctx.message.guild.voice_client
    if voice_client.is_connected():
        await voice_client.disconnect()
    else:
        await ctx.send("The bot is not connected to a voice channel.")Code language: Python (python)
Here we first check if the user who wants to play music has already joined the voice channel or not. If not, we tell the user to join first.
Awesome! Give yourself a pat on the back if you’ve reached this far! You’re doing great. In the next step, we’ll add the following methods:
- play()
- pause()
- resume()
- stop()
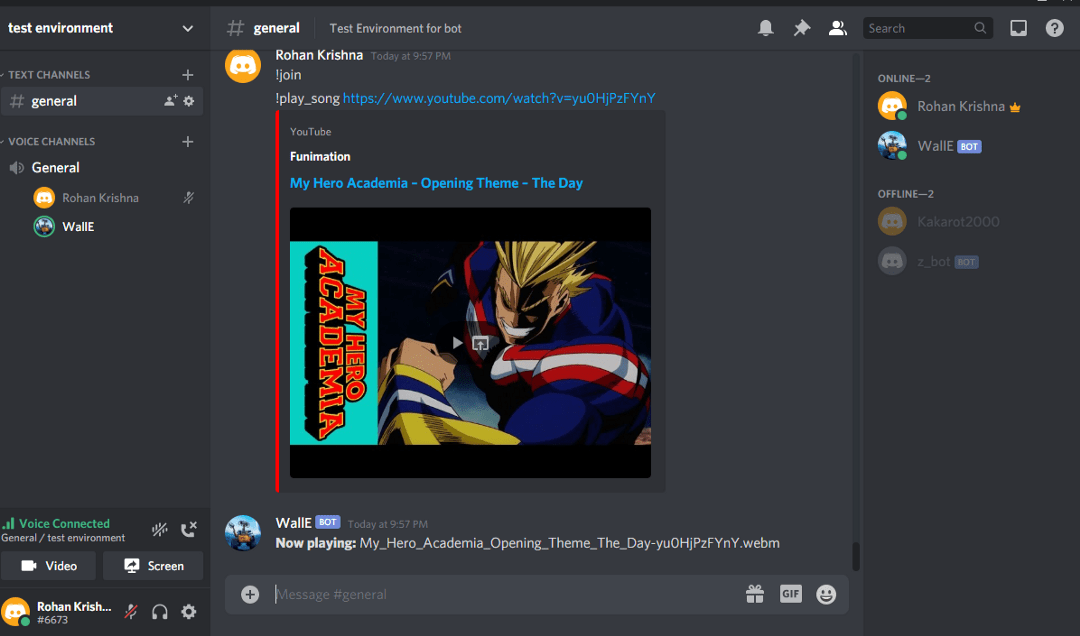
@bot.command(name='play_song', help='To play song')
async def play(ctx,url):
    try :
        server = ctx.message.guild
        voice_channel = server.voice_client

        async with ctx.typing():
            filename = await YTDLSource.from_url(url, loop=bot.loop)
            voice_channel.play(discord.FFmpegPCMAudio(executable="ffmpeg.exe", source=filename))
        await ctx.send('**Now playing:** {}'.format(filename))
    except:
        await ctx.send("The bot is not connected to a voice channel.")


@bot.command(name='pause', help='This command pauses the song')
async def pause(ctx):
    voice_client = ctx.message.guild.voice_client
    if voice_client.is_playing():
        await voice_client.pause()
    else:
        await ctx.send("The bot is not playing anything at the moment.")

@bot.command(name='resume', help='Resumes the song')
async def resume(ctx):
    voice_client = ctx.message.guild.voice_client
    if voice_client.is_paused():
        await voice_client.resume()
    else:
        await ctx.send("The bot was not playing anything before this. Use play_song command")

@bot.command(name='stop', help='Stops the song')
async def stop(ctx):
    voice_client = ctx.message.guild.voice_client
    if voice_client.is_playing():
        await voice_client.stop()
    else:
        await ctx.send("The bot is not playing anything at the moment.")Code language: Python (python)
At this point, we need to have the ffmpeg binary in the base directory. It can be downloaded from https://ffmpeg.org/. In this case, I used the exe since I’m using a Windows machine.
Part 4: Running the Python Discord bot locally
Add the final piece of code to start the bot and it’s done:
if __name__ == "__main__" :
    bot.run(DISCORD_TOKEN)Code language: Python (python)
To deploy the bot locally, activate the virtual environment and run the app.py file:
(venv1) C:\Github\Discord-Bot>python app.pyCode language: PowerShell (powershell)Bonus: send GIFs on start-up and print server details
In this bonus section, we will set up our bot to listen to events such as start-up. This example sends a previously downloaded GIF image to the text channel when the bot is activated:
@bot.event
async def on_ready():
for guild in bot.guilds:
for channel in guild.text_channels :
if str(channel) == "general" :
await channel.send('Bot Activated..')
await channel.send(file=discord.File('add_gif_file_name_here.png'))
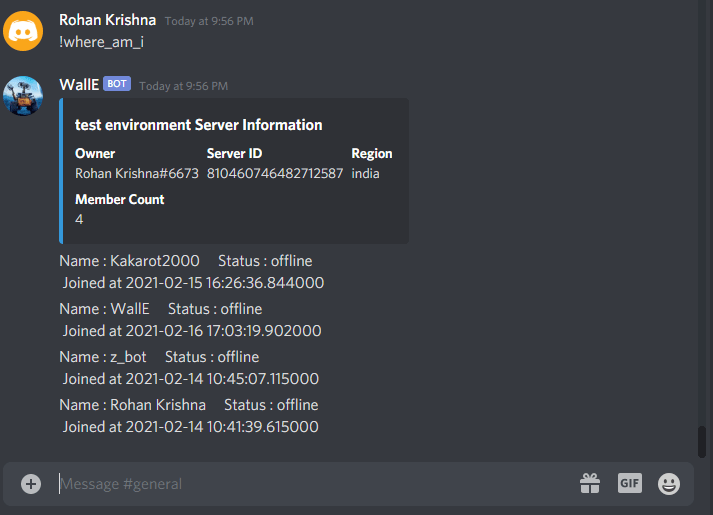
print('Active in {}\n Member Count : {}'.format(guild.name,guild.member_count))Code language: Python (python)To print server details such as owner name, the number of users, and a server id, we can add a bot command ‘where_am_i’:
@bot.command(help = "Prints details of Server")
async def where_am_i(ctx):
    owner=str(ctx.guild.owner)
    region = str(ctx.guild.region)
    guild_id = str(ctx.guild.id)
    memberCount = str(ctx.guild.member_count)
    icon = str(ctx.guild.icon_url)
    desc=ctx.guild.description

    embed = discord.Embed(
        title=ctx.guild.name + " Server Information",
        description=desc,
        color=discord.Color.blue()
    )
    embed.set_thumbnail(url=icon)
    embed.add_field(name="Owner", value=owner, inline=True)
    embed.add_field(name="Server ID", value=guild_id, inline=True)
    embed.add_field(name="Region", value=region, inline=True)
    embed.add_field(name="Member Count", value=memberCount, inline=True)

    await ctx.send(embed=embed)

    members=[]
    async for member in ctx.guild.fetch_members(limit=150) :
        await ctx.send('Name : {}\t Status : {}\n Joined at {}'.format(member.display_name,str(member.status),str(member.joined_at)))

@bot.command()
async def tell_me_about_yourself(ctx):
    text = "My name is WallE!\n I was built by Kakarot2000. At present I have limited features(find out more by typing !help)\n :)"
    await ctx.send(text)Code language: Python (python)
This is what this will look like:
You can view and clone the complete results from my Discord-Bot GitHub Repository.
That’s it! We made a Python Discord bot. Thank you for reading, and don’t hesitate to leave a reply or ask your questions in the comments section.